Using Resin 3D Printing in DIY: Building Light Panel
Summary
- Zortrax Inkspire UV LCD resin 3D printer can be easily implemented in a DIY workshop.
- Get Hands Dirty, a popular DIY YouTuber uses White Zortax Resin BASIC and Grey Zortrax Resin BASIC for most of her projects based on 3D printing.
- The quality and precision of the Inkspire minimize the amount of time spent on post-processing the prints.
Cristiana Felgueiras, known as Get Hands Dirty, is a popular DIY (do-it-yourself) YouTuber, specializing mainly in furniture-making, whose channel is based solely on „building stuff with one’s own hands.” She has already used multiple manufacturing techniques in her work, including, e.g. wood carving and molding. Having recently incorporated 3D printing into her craftsmanship, she noticed how beneficial this technology might be in the DIY sector. With the use of the Zortrax Inkspire resin 3D printer, she designed and built an amazing light panel. This is what it looks like.
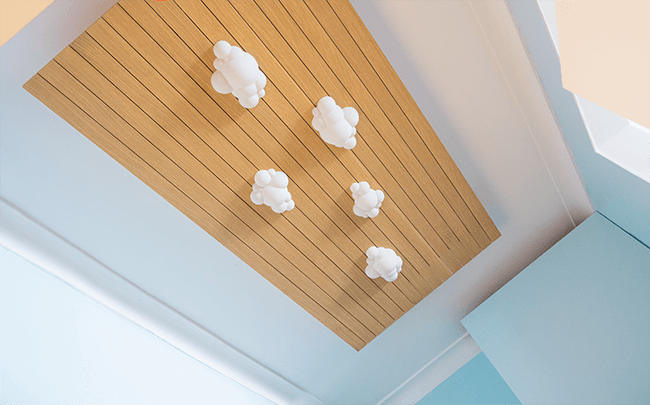
The finished project of a cloud ceiling panel by Get Hands Dirty.
Using Zortrax Inkspire 3D printer has not only come in handy while creating rounded shapes of the lamps for the panel, but also noticeably facilitated the whole manufacturing process. As she put it: „it can get really hard to model certain forms and shapes by hand. The fact that I can press a button and get multiple copies of the same object is also amazing and massively reduces the time and effort spent on a certain project.” So, what exactly did she do to build the light panel?
Designing and Printing 3D Models
Workflow step 1: Digital Design
Cristiana begins the creative process with sketching the models on paper and then designing the desired elements in 3D modeling programs. For this purpose, she uses such software as SketchUp for geometrical forms or Fusion 360 while dealing with more organic shapes. When using digital design, „it’s a lot easier to end up with a product with accurate measurements, square angles, evenly spaced details, and geometrically perfect shapes,” she underlines. Digital design has hence proved really useful in the case of cloud-shaped lamps needed for the panel as it is difficult to achieve such an irregular form by hand.

Before the project is uploaded to a digital design program and then cut in Z-SUITE, Get Hands Dirty sketches it on paper.
In order to prepare the models for 3D printing, they need to be sliced in Z-SUITE, dedicated software that comes together with all Zortrax machines. As Z-SUITE was engineered to automatically adjust the most optimal parameters for given projects, there is no need to change much about them. „I usually keep the automatic settings on Z-Suite and use 0.05 layer thickness. Depending on the project, I might reduce the supports thickness and density to prevent the model from getting damaged when the supports are clipped off,” Get Hands Dirty says. Having adjusted the support-related settings when needed, she moves on to the fabrication process.
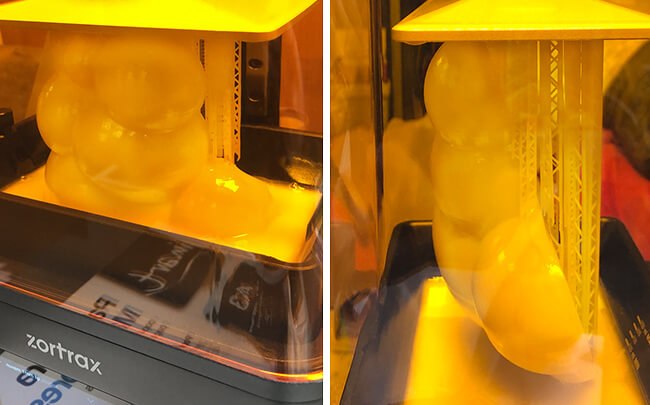
The cloud-shaped models during resin 3D printing process on Zortrax Inkspire.
Workflow step 2: Resin 3D Printing
In this stage, the creator selects the resins which she would like the models to be printed with. The two Zortrax BASIC resins that come in a package together with the Inkspire, are appropriate for most of her projects. Depending on the effect she aims to achieve, she most often opts for grey and white resins. The former serves as a perfect base for all the models that are to be painted later on, whereas the latter is her first choice when the objects’ target color is white. Although this universal duo is sufficient for many various projects, the range of resins that the influencer wants to try does not end here. As she states: „I use photopolymer resins mostly in white and grey as, honestly, these materials are appropriate for most projects. I still want to explore the translucent and flexible ones, too.” As the cloud-shaped lamps are white, Cristiana’s resin of choice for this project was clearly Zortrax BASIC white.
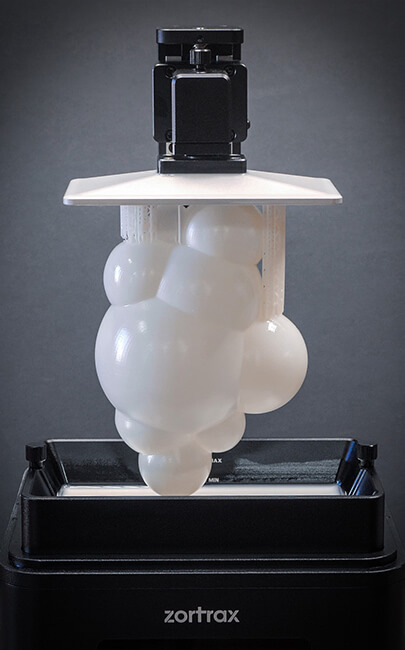
The Zortrax Inkspire is perfect for 3D printing intricate shapes.
Applying Post-processing Techniques
Workflow step 3: Cleaning and supports removal
Once the resin printing process is finished, Get Hands Dirty cleans up the prints and removes the supports, placed in Z-SUITE to prevent certain fragments of a given model from collapsing. Then, she leaves the models to cure in the sun. This procedure accelerates the hardening of the models 3D printed with the use of UV-LCD technology and prepares them for further post-processing stages. Here, the choice of techniques used depends widely on a given model’s shape and purpose. Sometimes, she sands its surface to give it a smooth feel and look. Some other time, she drills holes she had forgotten to add to the model while designing it. Frequently, after supports removal, the designs do not need any further post-processing, though. This was the case with lamp designs. They were practically ready right after Cristiana cleaned the prints and got rid of unnecessary supporting fragments.

The lamp shade prints do not need much post processing: support removal is enough.
Workflow step 4: Assembling all the parts
In order to assemble the light panel, ready-to-use 3D printed parts have to be joined with the bases and then attached to the wooden back panel. Both the bases and the wooden panel were prepared by Get Hands Dirty before – she took care of the accurate connection of all the electrical parts, ensuring their proper functioning. Having joined the cloud-shaped 3D-printed forms to the panel, Cristiana achieved the final result: a unique, custom-made light panel. It may now be used to light up and decorate any room.
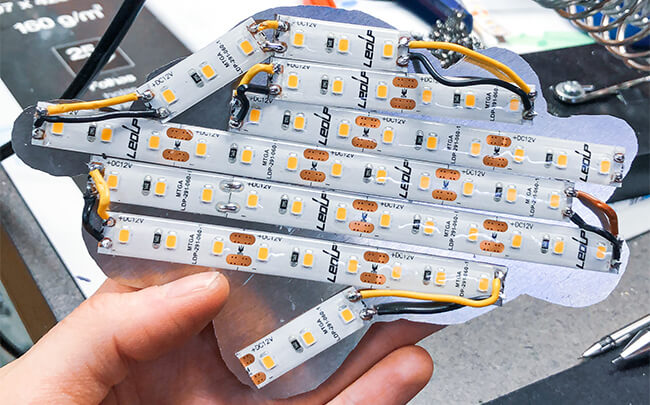
The bases of the cloud-shaped lamps need to be joined with electrical parts.
As Get Hands Dirty underlines, the DIY process is rewarding in a way that you can surround yourself with handmade objects which are not only beautiful but also pragmatic. „I like to explore different ideas from large to very small dimensions and lately I’ve been moved mostly by the necessity of having certain functional pieces around me,” she claims. The light panel, which she created with the use of Zortrax Inkspire, is the perfect example of the looks and utility combined. Having learned the benefits of having a 3D printer in a DIY workshop, Cristiana Felgueiras now recommends it to “anyone wanting to bring ideas, which are hard to produce by hand, to life.”
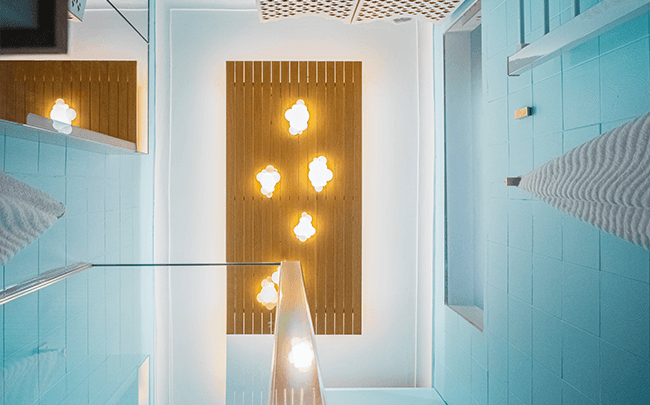
The panel created by Cristiana Felgueiras installed in a bathroom to light up its interior.