3D Printing Mock-Ups to Solve Problems with Equipment Placement in Factories
Summary
- ABLAB3D is a freelance Engineering and Business Consulting studio dealing mainly with Design and Consultancy for the industrial sector
- Alfonso Buonora, a designer working for ABLAB3D, uses Zortrax M200 3D printer to manufacture detailed mock-ups of industrial plants for his customers, helping them to establish the most effective production lines layout
- For his latest project, commissioned by an Italian producer of canned goods, he has used such materials as Z-ABS, Z-HIPS, Z-ULTRAT and Z-PLA PRO
Alfonso Buonora is a mechanical designer with 15 years of experience in working for ABLAB3D, a Design and Consultancy studio. He cooperates with various industries helping them to devise the most efficient layout of production lines within their factories. To do so, he designs and constructs mock-ups of whole industrial plants as well as individual machines that compose them. For both prototyping and manufacturing purposes ABLAB3D takes advantage of Zortrax M200. Here are the reasons for using 3D printing in Mechanical Engineering and the step-by-step process of developing a mock-up for food industry, commissioned to Alfonso by an Italian producer of canned goods. This is what the target project looks like:
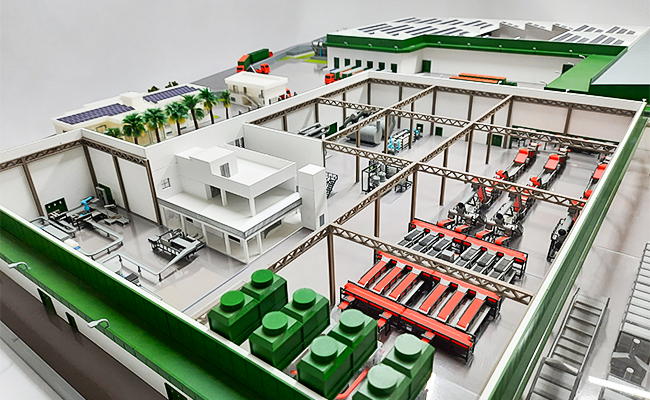
The picture shows the 3D printed plant mock-up for the Italian food manufacturer by ABLAB3D.
Introducing 3D Printing to a Design Studio: In Search for a Perfect 3D Printer for Rapid Prototyping
ABLAB3D introduced additive manufacturing solutions to their business in 2016. The idea to buy a first 3D printer was born from the need to obtain realistic scale models that would allow the designer to show a complete plant layout to his customers. He needed to be able to simulate, analyze and calibrate the various positions of individual machines with the clients in a more direct and intuitive way than just through CAD design. Having tested his first 3D printers (both cheap and more advanced), he knew this technology was a proper one for his purposes. He still had to find a printer that would eliminate the problems he repeatedly encountered, though, such as, e.g. high number of failed prints or a time-consuming process of identifying the correct printing parameters. A market research for a more reliable and precise 3D printer led Alfonso to Zortrax.
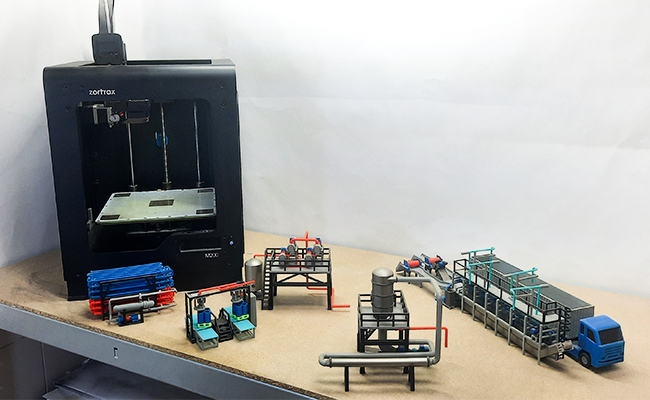
In the photograph, there is a Zortrax M200 3D printer used by ABLAB3D, accompanied by the models 3D printed by Alfonso Buonora for his mock-up project.
From this time on, 3D printing has become an integral part of his work. “I use 3D printing for the creation of scale models of demonstration purposes: displays within companies, fairs or conferences. I also develop the projects for educational purposes and functional models. Moreover, Zortrax desktop 3D printer is great for rapid prototyping in 1:1 scale,” says Alfonso Buonora. One of the latest projects by ABLAB3D is a mock-up created for an Italian food manufacturer who had to build a new production facility. Here are the steps of developing this project.
How 3D Printing Helps to Get Rid of Problems with Equipment Placement in Factories: Creating Mock-Ups
First, the designer analyzes the drawings and renderings provided to him by an architect. On this basis, he decides, amongst others, on the proper scale and the models’ dimensions. Having agreed on these, he moves on to CAD modeling in a 1:100 scale. In this step, it is important to consider the minimum dimensions and layer thickness that can be 3D printed. Once these parameters are set, Alfonso proceeds to 3D printing of all the models he’s modelled in CAD software.
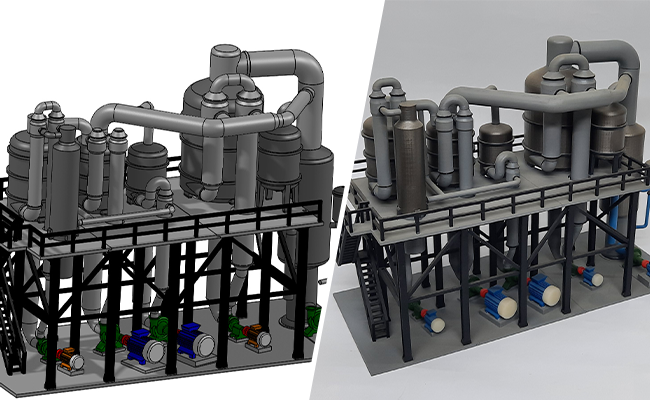
The graphic shows a rendering of one of the models for the mock-up (on the left) and the target 3D print (on the right).
ABLAB3D uses the wide range of Zortrax filaments for 3D printing. In the case of the latest project, he used Z-ABS for all the systems and machines. Z-HIPS, Z-ULTRAT and Z- PLA PRO were used for the larger prints, such as buildings, canopies, gates and all masonry areas within the plant mock-up. When it comes to the printing parameters in Z-SUITE software, all the smallest parts that needed a high level of detail were printed with 0.09 mm layer height, while larger parts worked well with 0.19 mm layer height. The infill was always left around 20-30%, with the quality set on High, except for the parts that had to undergo post-processing and painting.
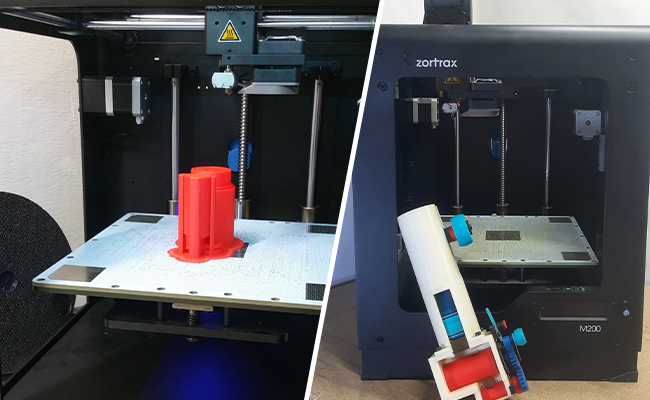
On the left, you can see the model on the platform, right after 3D printing process, whereas on the right, an assembled part for the mock-up.
Various parts that make up a single piece were designed with joints in order to be easily assembled and glued. Most of the pieces that make up the final mock-up were 3D printed in several parts which were then glued together. For this purpose, Alfonso used an epoxy resin for the larger parts that were subjected to greater forces and cyanoacrylate glue for all the smaller parts.
When it comes to post-processing of the 3D prints, some of them were subjected to acetone vapors to smooth the models and give them a desired, shiny effect. The parts which Alfonso planned to paint, were smoothed with a sandpaper of different grains – starting from 180-220 and moving on to fine-grain ones. Some individual parts were also filled with two-component putty and smoothed until a surface ready for painting was obtained. Finally, Alfonso sprayed the models with the chosen colors and covered them with transparent layer for protection.
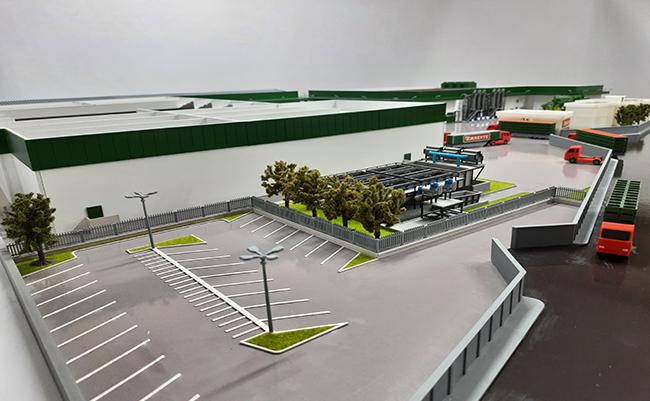
The model of a mock-up showing the parking lot in the plant area with the assembled 3D printed models.
“Zortrax M200 is an excellent machine that allows me to obtain outstanding results and, above all, it’s truly easy-to-use. Thanks to having it in my workshop, I am able to get the job done despite my working alone,” concludes Alfonso Buonora.
Read more about the Zortrax M200 Plus, a currently available equivalent of the 3D printer used by ABLAB3D.
For more interesting user stories, go to our Zortrax Blog.